I spent all of my Friday night struggling to get Domain Mapping to work so I thought I would put together a little tutorial to help others since my setup seemed unique. If not unique, not well documented!
Here’s what I have:
- Domain name pointed to the DNS servers of my host
- CPanel to manage my hosting
- WordPress 3.1.1
- Multisite has been activated with subfolders
Thats essentially it. The settings that were not really well documented involved CPanel, Multisite using subfolders, and certain aspects of the domain mapping plugin’s installation.
Continue reading for the helpful parts.
I will assume that anyone reading this has the same setup I mentioned above already existing. So those are the requirements and I will be moving forward from there.
I’ve divided this tutorial into three sections:
- CPanel
- Plugin Installation
- Plugin Configuration
CPanel
The first thing we want to do is go into CPanel.
There are just two things we need to do in here; park the domain and verify a DNS entry.
To park the domain do the following:
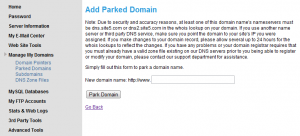
Manage My Domains > Parked Domains
Click the link to add a new parked domain and you should see something similar to the below

Just go ahead and add your domain. Thats pretty much all there is to parking the domain.
Next we need to verify that there is a DNS entry pointing to our server’s IP address. In CPanel, navigate to the following:
Manage My Domains > DNS Zone Files > Select your domain in the drop down > Click ‘View/Edit Zone File’
You should see the following entry in the listing. If you do not, add it replacing the XXX.XXX.XXX.XXX with the IP address of your server.
Once you have verified both of those changes, you are all set with CPanel and can move on to your WordPress setup.
Installing the Domain Mapping Plugin
The Domain Mapping plugin is the secret sauce that makes all this work. Unfortunately, its not a straight forward installation like most other plugins.
This caused a lot of confusion for me. This plugin needs to be installed in the mu-plugins folder. The confusing thing to me was that I thought the mu-plugins directory was an older folder from the WPMU days before Multisite was integrated into the main WordPress code branch. Since it was not autogenerated in folder structure, I assumed that this was an outdated reference that really meant the wp-content/plugins directory.
Fun fact: The MU in mu-plugins does not stand for Multi User. It stands for Must Use.
Any plugin installed in this directory is automatically activated for the whole network. Also, it will ignore any subfolders and their contents. It will only read php plugin files in the folder’s root. The file can then call a file within a subfolder, if needed. You can imagine my frustration when I finally found that footnote listed once in the codex.
So here is how to install the plugin:
/* That's all, stop editing! Happy blogging. */

/** Absolute path to the WordPress directory. */
if ( !defined('ABSPATH') )
	define('ABSPATH', dirname(__FILE__) . '/');

// for domain mapping plugin
define( 'SUNRISE', 'on' );

/** Sets up WordPress vars and included files. */
require_once(ABSPATH . 'wp-settings.php');
Now that you have placed the folder in the appropriate place, moved the two files and updated the wp-config.php file, you are now ready to start configuring the plugin and mapping.
Configuring the Domain Mapping
When you login using your super admin account and navigate to the plugin screen, you should see something like the following.

So far, so good?
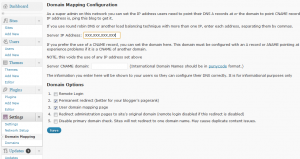
Go to Settings > Domain Mapping
You should see something like the following:

Simply enter the IP address of your hosting server in the appropriate box. In the example above, I filled it in with XXX.XXX.XXX.XXX.
As for the checkboxes I found what worked best was to check:
- Permanent Redirect – essentially redirects all traffic to your new domain name, even if they try to naviage to your original blog url (site.com/blog). This helps make your traffic more consistent for analysis and search engines
- User domain mapping page – allows for the admins of each individual blog to setup a domain mapping for that specific blog. If you are running a large network (like WordPress.com), this is pretty much a must. If its a small network and you are running all of the blogs, then its a personal preference
Next, you will go into the blog you want your domain to point.
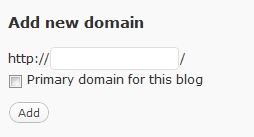
Dashboard > Sites > Go to the Dashboard of the appropriate blog > Tools > Domain Mapping

Here, you just need to add the domain name in the text box, check the box for Primary domain and click Add.
Thats it!
Once you make the change, it may take a bit for things to propagate, so if you get kicked out of your blog and can’t access it, wait an hour or two. It wasn’t working for me and I gave up in frustration and went to bed. The next morning it was working without issue. If you need to get back into your blog, enter the main site as the super admin. If you think you have done something wrong with the setup, go to Settings > Domains and remove the mapping for your blog.
This method works with both subfolders and subdomains. It was once the case that it only worked with subdomains, but that is no longer true.
Leave a Reply